

April 30, 20265 min read
A few weeks ago I wrote about teaching Claude to design TUIs. That skill did its job. I used it to rebuild coco‘s interactive mode into a real workstation: a three-pane layout with a commit graph, a diff viewer, hunk-by-hunk staging, branches, stashes, the lot. It looks good.
Which created a new problem. A good-looking terminal app is useless on a README if you can’t show it. I needed screenshots. I needed demo GIFs. I needed them crisp, consistent as the UI changed, small enough that GitHub would actually inline them, and regenerable with one command every time I shipped a feature.
That turned out to be a craft of its own, with a surprising number of ways to get it subtly wrong. So, same move as last time: I learned it properly, then handed the knowledge to Claude as a skill.
vhs-cli-demos captures deterministic screenshots and demo GIFs of any command-line or terminal app, using Charm’s VHS. VHS drives a real pseudo-terminal through a headless renderer, so what it records is pixel-identical to what a user sees. And because you script it with a small .tape file, every capture is reproducible down to the frame, including in CI.
The skill is the methodology, not coco’s specific setup. It works for any CLI in any language, because VHS only ever sees the terminal. It loads automatically when you ask Claude to record a CLI, make a README GIF, screenshot a terminal app, or shrink a GIF that’s gotten too big for GitHub.
Two failure modes dominate, and the skill is mostly about avoiding them.
The first is drift. A capture is only useful if it looks identical every run, and terminals are full of things that don’t: relative timestamps (“3 days ago”), spinner animations, a blinking cursor, today’s date in a status bar. You pin all of it. A fixed clock, a locked theme, animations off, and crucially enough settle time for the app to finish booting. Inside VHS an interpreted CLI can take two or three seconds to cold-start, far longer than it does warm, and if you don’t wait you capture a “loading…” screen instead of your UI.
Then there are the VHS-specific gotchas that bite everyone exactly once. VHS spawns a clean shell that doesn’t inherit your environment, so quote your PATH export wrong and the shell loses git and sleep and everything else. Screenshot file.png grabs one frame; Output file.png quietly records a whole directory of frames instead. On macOS the temp directories are symlinked in a way that trips git’s safety checks. None of these are hard once you know them. The whole point of a skill is that it knows them so you don’t have to rediscover each one at midnight.
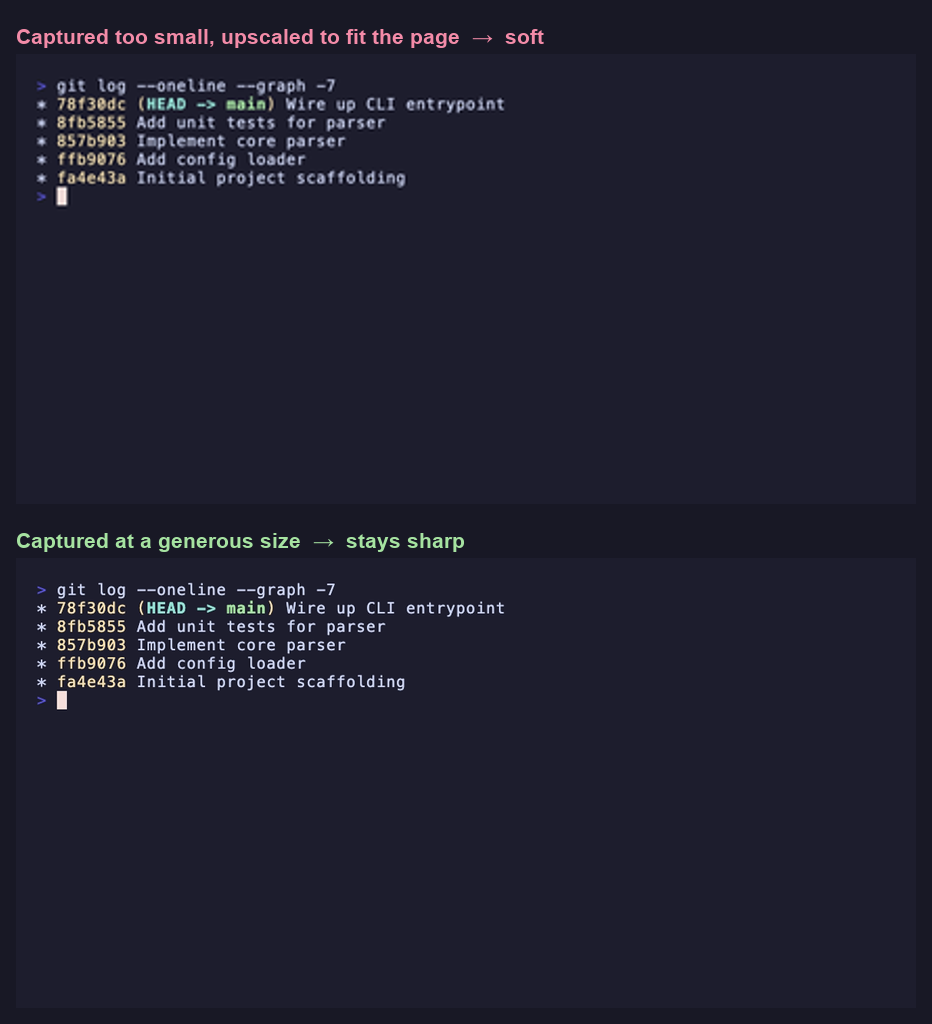
Here’s one I almost shipped, and then almost shipped the wrong explanation for. My first capture of coco’s diff view came out looking subtly wrong: the text soft, a little smeared. The fix was easy enough (stop hand-setting the canvas size and let VHS size it), so I wrote it up in the skill with a tidy mechanism. VHS sizes its output in pixels, I explained, but a terminal renders a grid of character cells; pick dimensions that don’t land on whole cells and the renderer stretches the glyphs to fill the gap. Clean story. Wrong story.
I found out it was wrong when I sat down to make a before-and-after image for this very post and couldn’t reproduce the stretching. So I tested it head-on and captured a deliberately oversized canvas to force the effect. VHS just left a big empty margin on the right. It doesn’t stretch glyphs at all. My mechanism was invented.
The real story is duller and more useful. My broken capture wasn’t stretched, it was small, and the page had scaled it up. Bitmap upscaling is what softened the text. Letting VHS use its roomy defaults fixed it because the capture comes out big enough that nothing has to upscale it, not because it “unstretched” anything. I corrected the skill: same advice, true reason. The thing I’m actually proud of catching is my own confident, wrong explanation, before it got past a v1.0.0 tag. Here’s the real difference, the same view captured too small and upscaled versus captured at a generous size:
This is the big one. VHS writes every frame in full, with no deduplication. So a ten-second demo where almost nothing moves between frames still comes out at 10 to 20 megabytes. That’s a non-starter for a README. GitHub won’t inline it, and it loads forever.
The fix is one line, and it’s lossless. gifsicle -O3 rewrites the GIF with inter-frame transparency optimization, storing only the pixels that actually change between frames. No quality loss, no color reduction, nothing thrown away. On one of my real demos it took a 15 MB file down to 0.4 MB, a 30× reduction with zero visible difference. The skill bakes this into the pipeline so it happens automatically, and it’s emphatic about not reaching for lossy compression as the default, which is the tempting and wrong move. (More on that shortly.)
The other lever is the demo itself. A shorter, more focused recording is simply fewer frames before optimization even runs. Which brings me to the part I find most fun.
The thing that finally made my GIFs good was realizing a .tape file isn’t a config file. It’s a screenplay. You’re directing a short scene: what gets typed, how long each beat holds, when the camera clicks.
The rules fall out of that framing. One story per demo: make a single point and stop. Show contrast, not completeness, because two views proving a behavior beats six enumerating it. Budget actual read time after each action, since a demo that moves too fast to follow is worse than no demo. And end on the rendered UI, never on the stray shell prompt that appears after the app quits. They sound obvious written down. They are not obvious on your fourth re-record at 11pm wondering why the thing feels frantic.
To make that concrete, here’s a complete tape for a tiny git demo, and the GIF it produces (after one pass through gifsicle -O3):
Set Shell "bash"
Set FontSize 20
Set Theme "Catppuccin Mocha"
Set CursorBlink false
Output demo.gif

Hide
Type "cd ~/project" Enter
Type "clear" Enter
Show

Sleep 1s
Type "git status --short --branch" Enter
Sleep 2s
Type "git log --oneline --graph -7" Enter
Sleep 2s
Something I did differently this time: I actually tested whether the skill helps, instead of assuming it did.
I ran the same prompts twice, once with the skill and once without, on two different models. On the strong model (Claude Opus) the skill barely mattered. It already knows VHS, already reaches for the lossless optimization, already arrives at the right structure unprompted. With and without scored about the same.
On the weaker, faster model (Sonnet) the skill earned its keep. Asked to shrink an oversized GIF, the no-skill version led with lossy compression, --lossy=80 --colors 256, quietly degrading the image, as its very first recommendation. The skill version led with the lossless pass and treated lossy as a last resort. Same question, materially different answer, and the skill was the whole difference.
That’s the honest case for a skill like this. It isn’t that it teaches a frontier model something it doesn’t know. It’s that it makes the right answer reliable: across models, across vaguer prompts, across the moments when a model would otherwise grab the easy, lossy shortcut. And it ships a tested optimization script so nobody has to reinvent it.
vhs-cli-demos lives in my gfargo/skills marketplace, bundled with tui-design in the terminal plugin. The two pair naturally: design a terminal app, then capture it.
/plugin marketplace add gfargo/skills
/plugin install terminal@gfargo-skillsThat gives you terminal:vhs-cli-demos and terminal:tui-design. You’ll also need VHS itself (brew install vhs) and, for the optimization step, gifsicle (brew install gifsicle).
It loads automatically when you ask Claude to record a CLI, make a demo GIF, or shrink one that’s too big. If you make something with it, I’d love to see it.
Discussion
Comments are powered by Disqus. Sign in once, comment anywhere.

